
INTRODUCTION
SHAULA-791 is a GSM gateway that can provide SMS and Call features for different Alarm systems. The features and functions may vary with firmware versions slightly but in general they are consistent. SHAULA-791 replaces SHAULA-V10. Below is the summary of features.
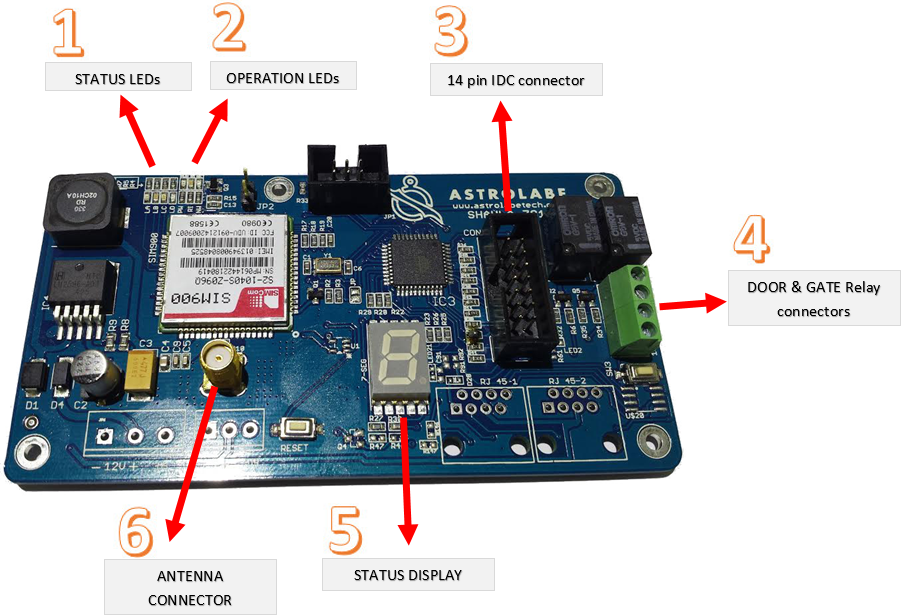
In the figure above SHAULA-V791 is shown labelled for important parts , we would explain these parts one by one .
1: STATUS LEDs
This is group of four LEDs that indicate different states and provide important information. Its important to understand these, as these can be very helpful in debugging and troubleshooting. The four LEDs are RED, GREEN, ORANGE and BLUE marked LA, LB ,LC and LD respectively.
2: OPERATION LEDs
This is group of three LEDs that indicate different operational states states of SHAULA-V791. The three LEDs are RED, BLE and GREEN marked PW, RI, and NW respectively.
3: IDC CONNECTOR
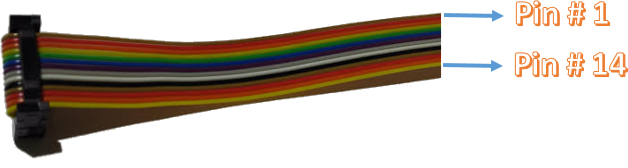
In order to work properly,SHAULA-V791 requires a few signals to work with , which should be made available on the IDC connector .The IDC connector is a 14 pin (2×7) connector. The pin-outs are as follows. (PIN One is marked as red)
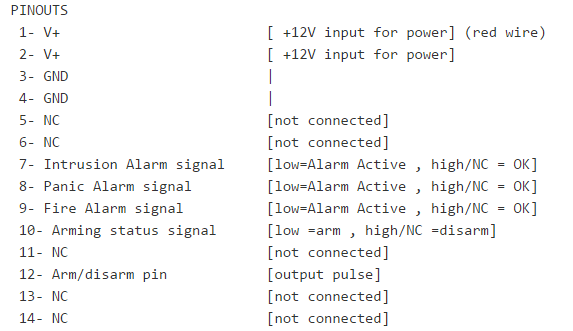
PINOUTS
4: GATE AND DOOR RELAY OUTPUTS
SHAULA-V791 can control gate and door using two on board relays. Common and Normal Open signals of both the relays are provided on this connector. Use`1C and 1NO` outputs for gate and `2C and 2NO` outputs for gate.
5: STATUS DISPLAY
This display helps in debugging and troubleshooting , It indicates different states of the operations, It shows when an SMS is received or sent , call is received or made, etc
| DISPLAY | OPERATION STATUS | PROGRAMMING STATUS |
|---|---|---|
| SHAULA-V791 initializing and is not yet ready | Admin number is not yet programmed |
|
 | SHAULA-791 initializing and is not yet ready | Admin number is programmed |
 | SHAULA-791 is trying to register to network | Admin number is not yet programmed |
 | SHAULA-791 is trying to register to network | Admin number is programmed |
 | SHAULA-791 is now in registered to network section* | Admin number is not yet programmed |
 | SHAULA-791 is now in registered to network section* | Admin number is programmed |
 | incoming Call(SHUALA-791 is receiving a call) | N/A |
 | Outgoing Call (SHUALA-791 is making a call) | N/A |
| incoming SMS (SHUALA-791 has received SMS) | N/A | |
 | Outgoing SMS (SHUALA-791 is sending SMS) | N/A |
* even if the SIM card has not yet registered, The operation for registered to network condition has started.
6: GSM ANTENNA
SHAULA-791 comes with a bendable GSM antenna .
SHAULA-791 Users and Permissions
SHAULA-791 supports 8 users and 1 Admin. The First thing to make the system work is program the Admin number. Later other users can be added.
ADMIN: SHAULA-791 needs to be programmed with admin to work. Admin can only be added when SHAULA-791 is in reset or default condition (there is no admin ). Admin has full rights on the system. Admin number can be programmed through the app as explained later in this manual. Once an admin is programmed only the admin (or users that are added by the admin ) can control the system. Admin can add or delete users and assign permissions for each user individuality.
USERS: SHAULA-791 can support 8 users. Users can be added by the admin or any other user with permission to add users. Users can be added to the system using the ASTROLABE SMS REMOTE II app. Permissions have to be given to the user during the process of adding a user.
PERMISSIONS:
Admin has all permissions, users can be given some permissions but a few permissions are reserved only for admin. Table below summarizes different permissions that can be assigned to users.
| PERMISSION | DESCRIPTION | REMARKS |
|---|---|---|
| ARM | user can arm the system and get status of the current arming mode | - |
| DISARM | user can disarm the system and get status of the current arming mode | - |
| USERS | user can add, delete and get list of users from the system | - |
| PARKING | user can open Parking gate either via calling or by the app | - |
| GATE | user can open gate via the app | - |
| CALL ALARM | user will receive call alerts if a security alarm is triggered and can reset the alarm | - |
| CALL PANIC | user will receive call alerts if a panic alarm is triggered and can reset the alarm | - |
| CALL FIRE | user will receive call alerts if a fire alarm is triggered and can reset the alarm | - |
| SMS ALARM | user will receive SMS alert if a security alarm is triggered. | - |
| SMS PANIC | user will receive SMS alert if a panic alarm is triggered. | - |
| SMS FIRE | user will receive SMS alert if a fire alarm is triggered. | - |
Following table shows the permissions that only admin have
| ADMIN ONLY PERMISSIONS | DETAILS | REMARKS |
|---|---|---|
| SET COUNTRY | set the country where the device is being operated. Important to be set, without setting this some features of the board will not work | - |
| SET DEVICE ID | Setting id for the device which is included in SMS replies. Helps in Identifying the device | - |
| SERVICE CODES | send USSD commands like the ones used to get the account balance details e.g. *102# | - |
| RESET | Reset all device information like ADMIN, USERs and Permissions. This will not overwrite the Following: - COUNTRY - DEVICE ID - OTHER PARAMETERS SET BY INSTALLERS LIKE POWER PARAMETERS AND DEFAULT GATE | - |
| SMS POWER | Admin will receive SMS Alerts for POWER source and Battery Levels. For example if the main supply is lost the admin will get SMS notification , If the main supply is returned again and got stable for one minute a "power restored" notification SMS will be sent to admin. If main supply is absent and battery gets low , or very low notifications will be sent to admin | - |
Controlling SHAULA-791 via SMS REMOTE II
SHAULA-791 can be controlled using the ASTROLABE SMS REMOTE II app, It is important to know about the app and use it as intended. The app is available for and android as well as iOS operating system on compatible devices. Here We would consider using the android app as the basic principle of using the app are similar.
Accounts: SMS Remote supports multiple accounts. An account is actually credentials and settings for a single device. You may use the same app to control one or more SHAULA-791 or any combination of supported devices. When the app is just installed the app requires you to create an account.
Creating an account is simple, select the device from the drop list (in our case SHAULA-791). This will load the required fields namely Device name, control panel sim number and password. Fill them and press done.
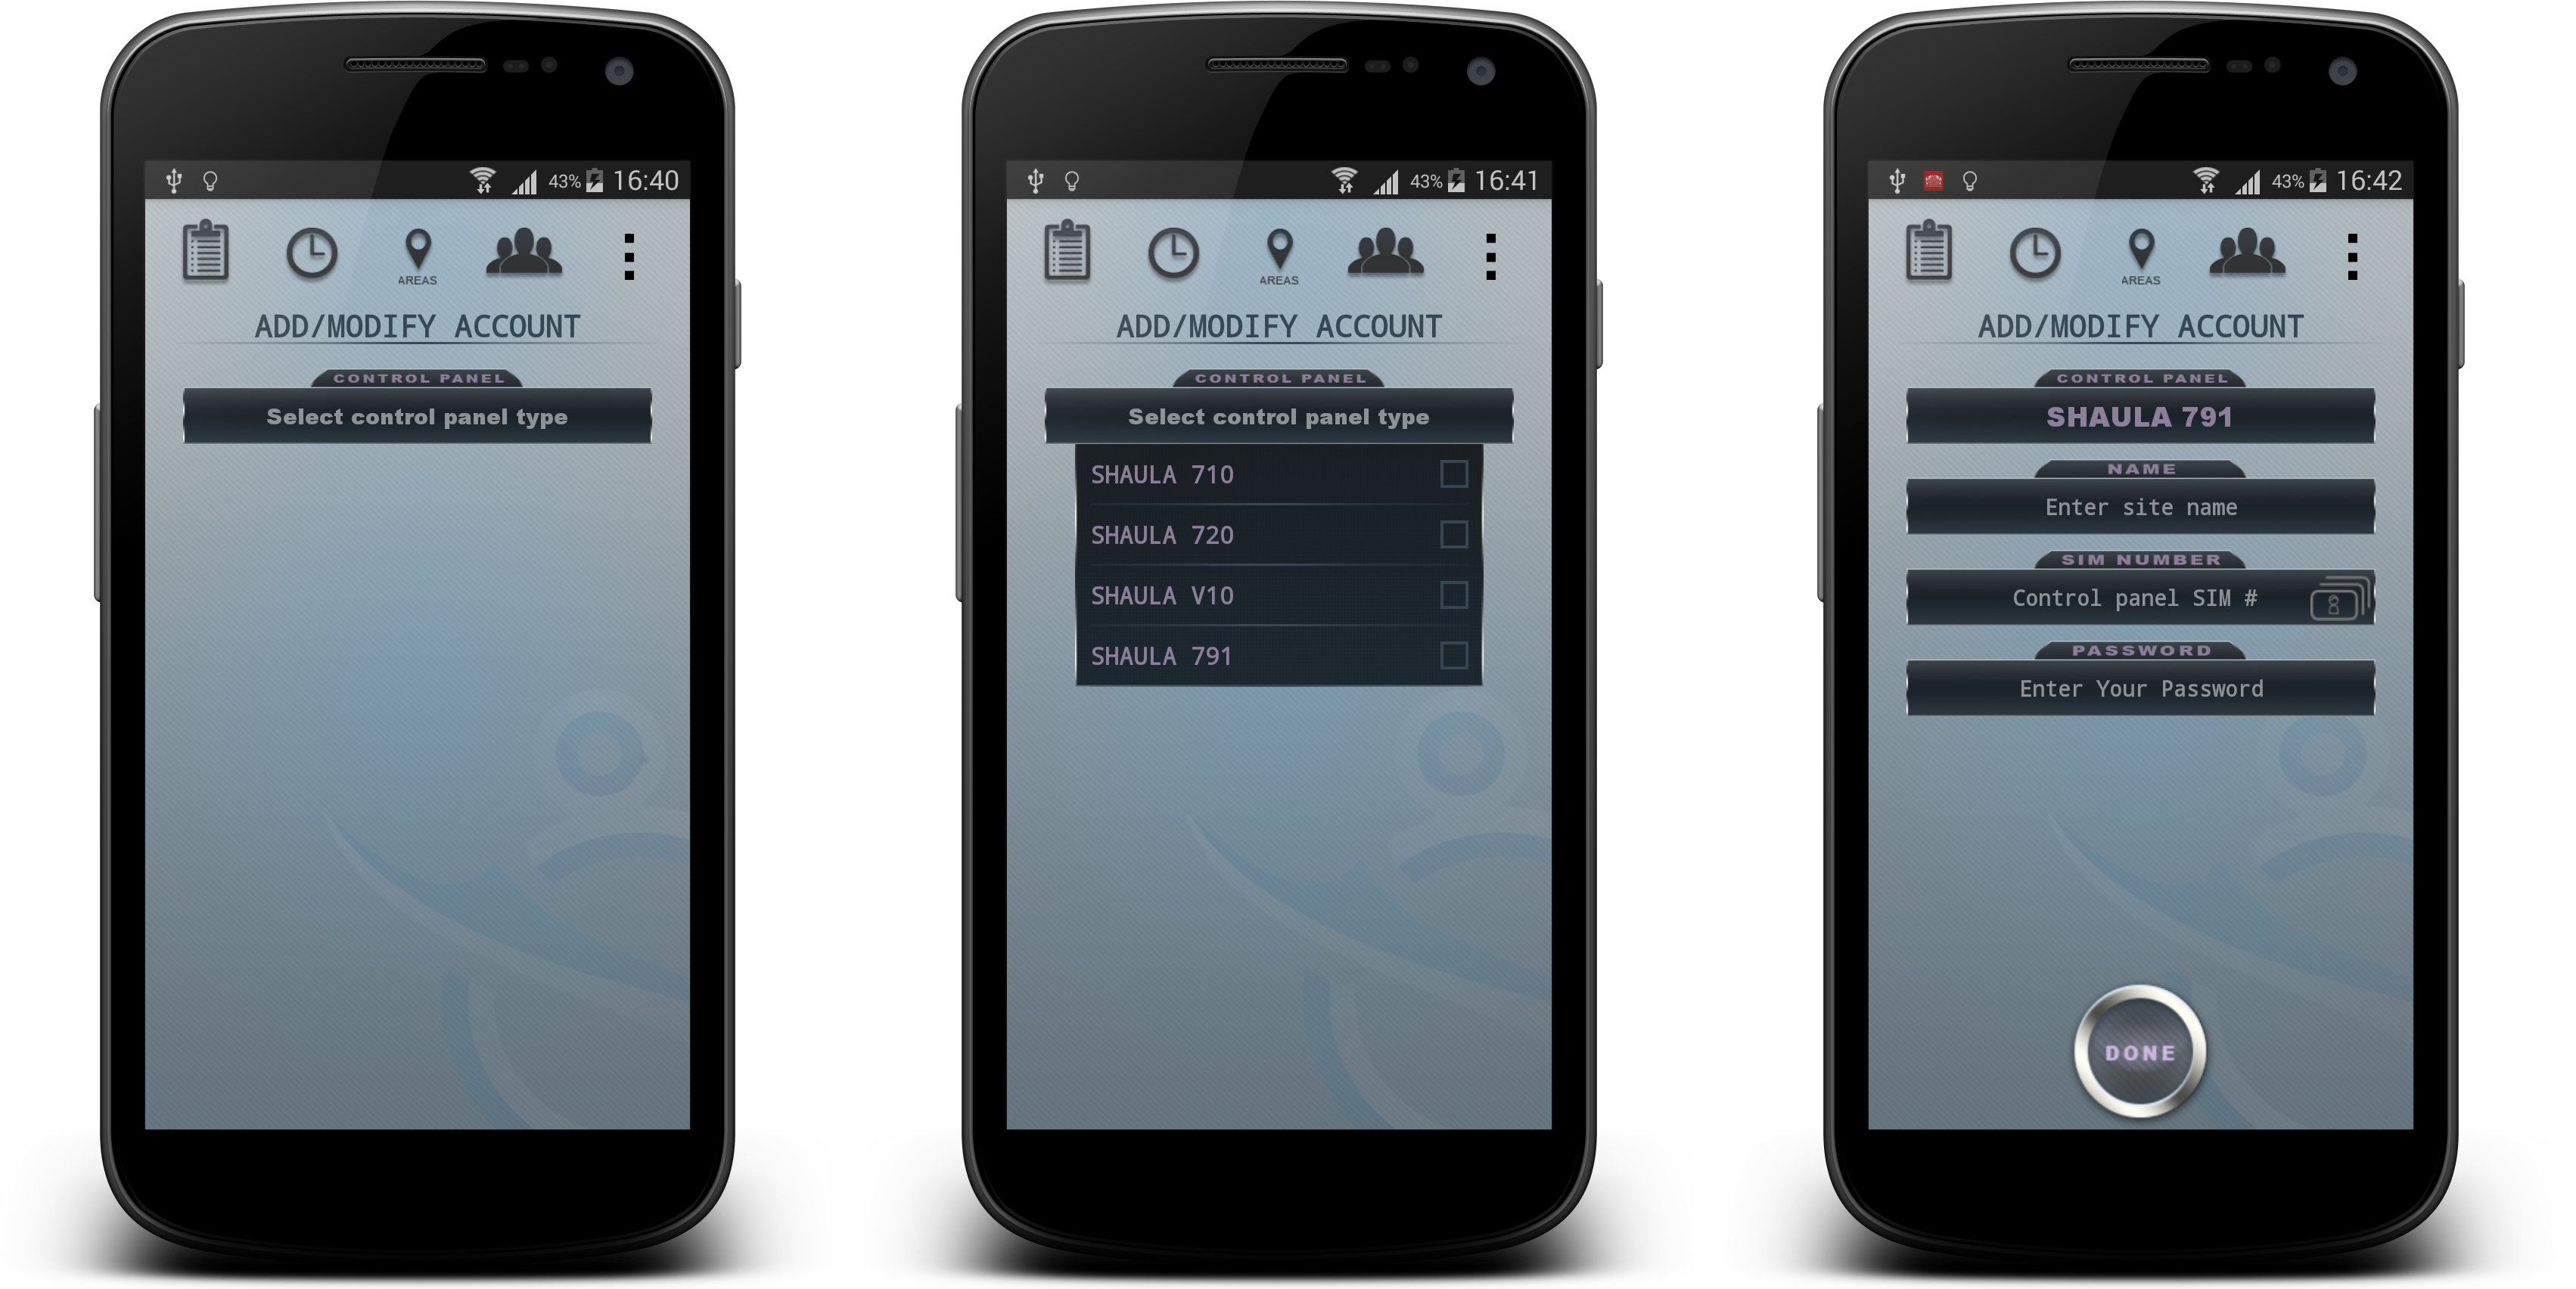
| FEILD | DETAILS |
|---|---|
| DEVICE / SITE NAME | Fill in a name for the device, this will help you identify this device/account. It can be anything e.g. HOME, MY OFFICE, etc |
| CONTROL PANEL SIM # | Enter the SIM card number that is installed in the device |
| PASSWORD | Enter the password for the device. This Password will be used in commands sent to board. If your account is created by admin, A password would have been assigned by the admin for you and that password must be used. |
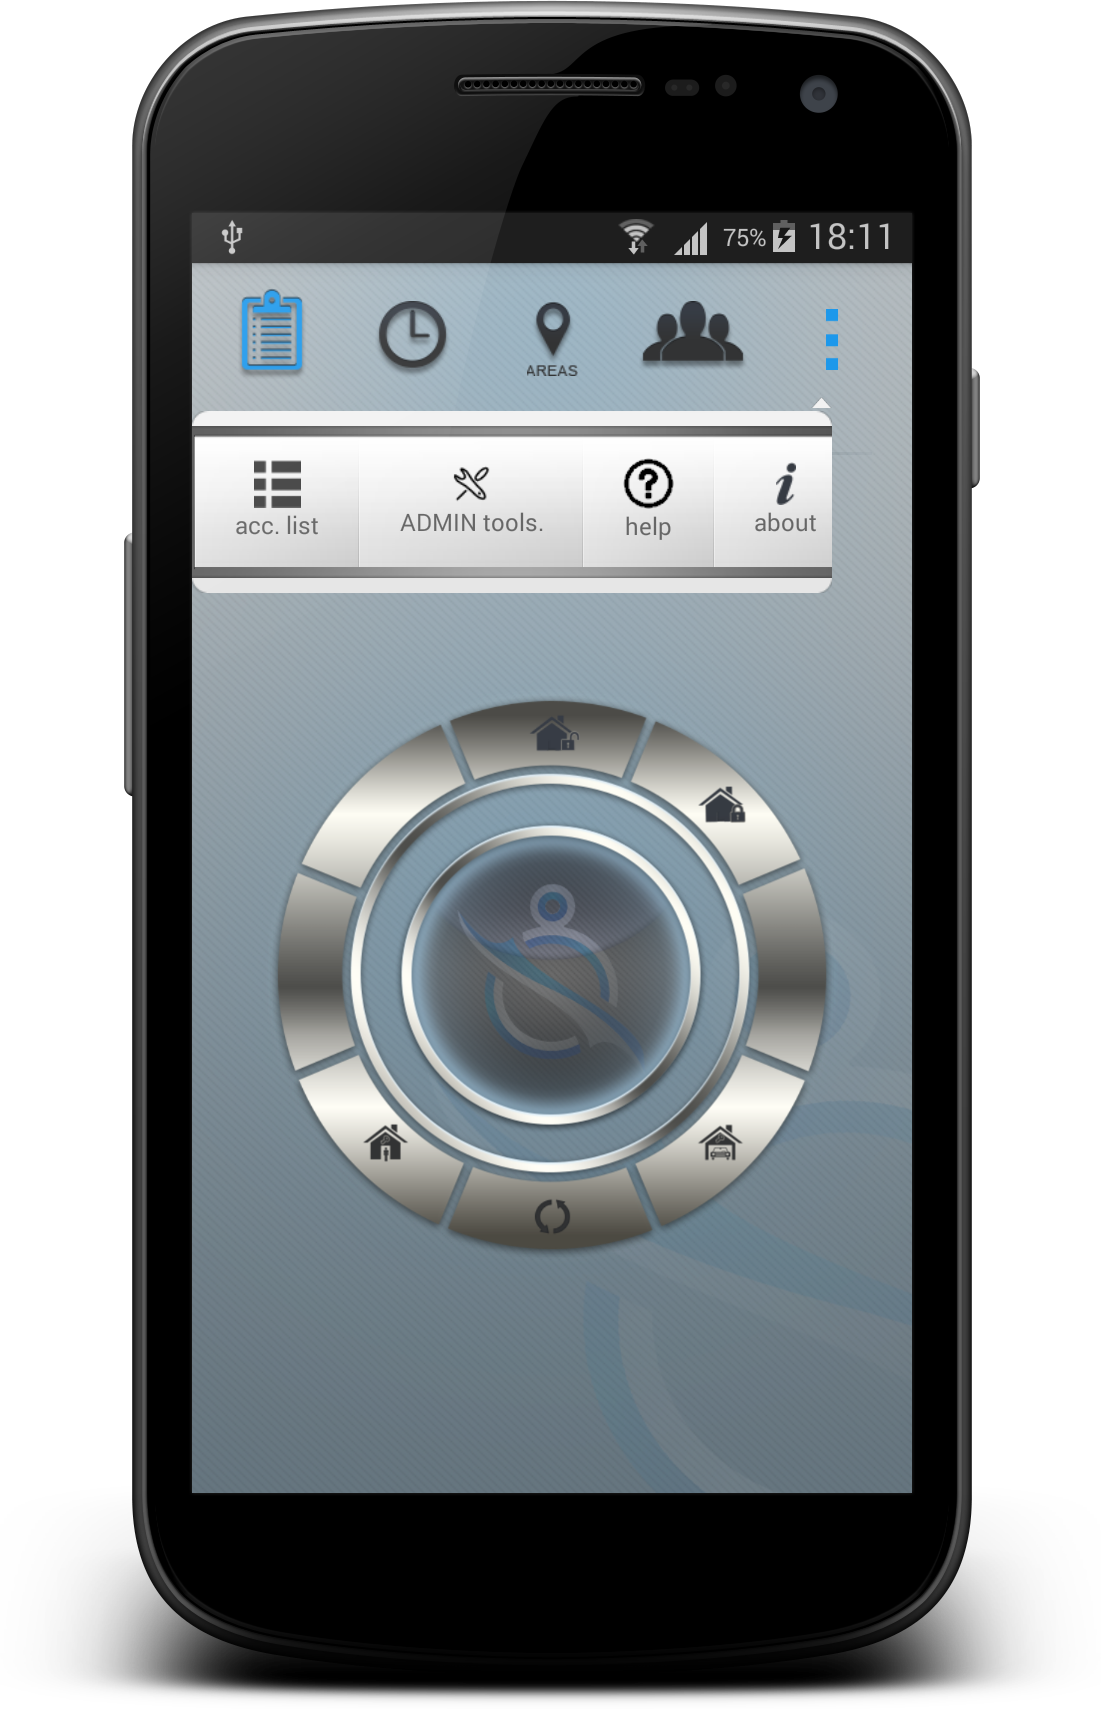
once an account has been added the app will advance to the accounts list page on launch if there are more than one accounts, otherwise it will auto select the only account available and open the remote page. Below is a screen shot of the remote page labeled.
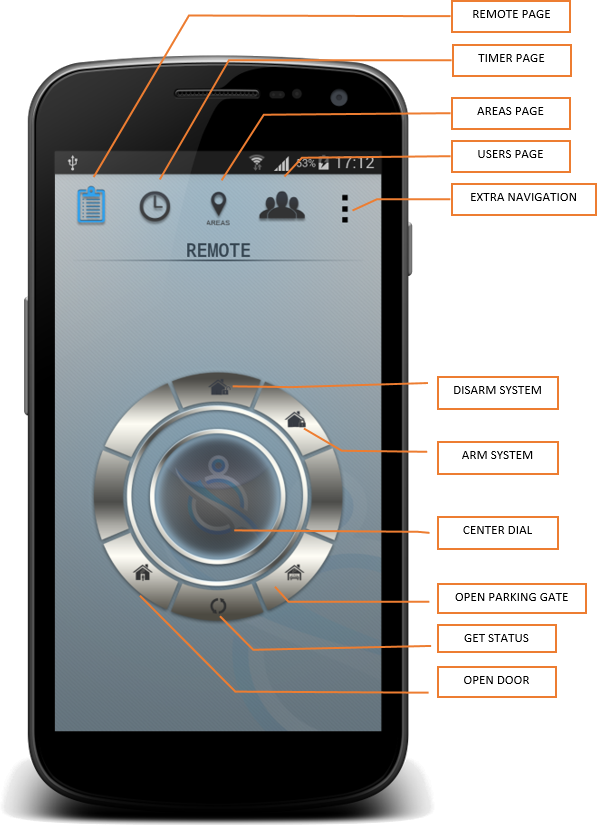
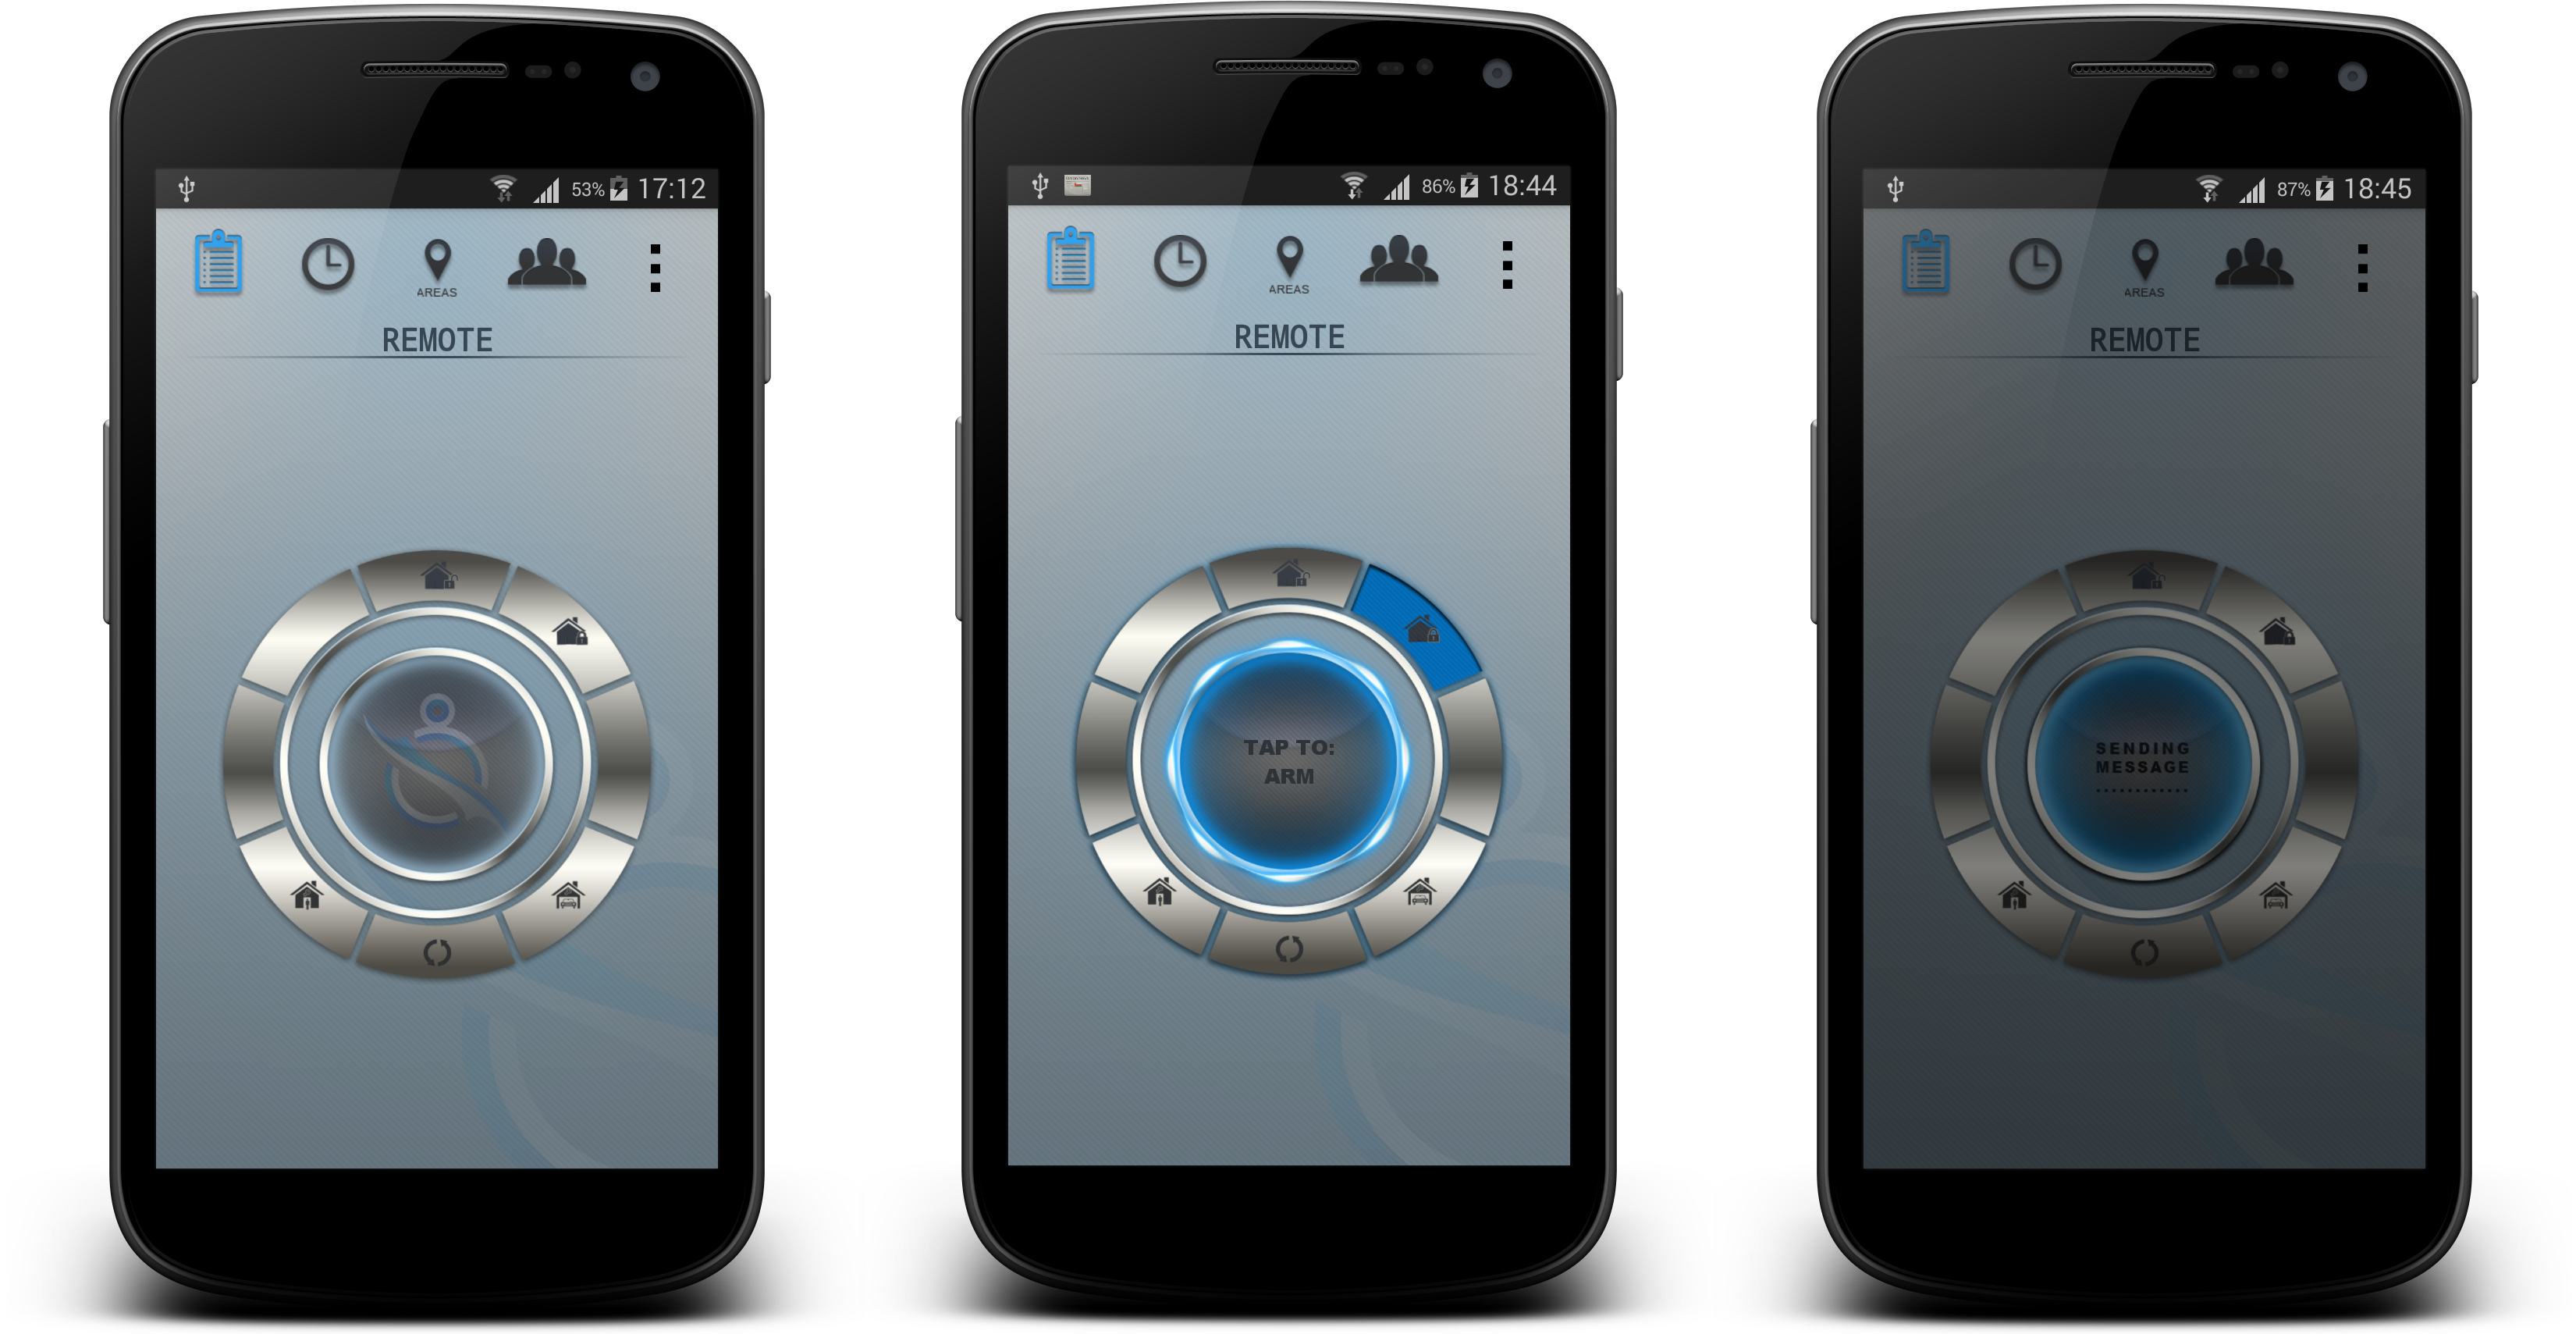
There is the top navigation menu, it is used to switch to different screens of the app. Some of the screens are only available for a few devices. The Extra Navigation button will load a another window containing a context aware menu (dynamic menu that can change according to the context). The remote dial is labeled above and is easy to follow. For example If you want to arm the system, press the arm button, the center dial will change and become a button. click on the center dial to execute the command.
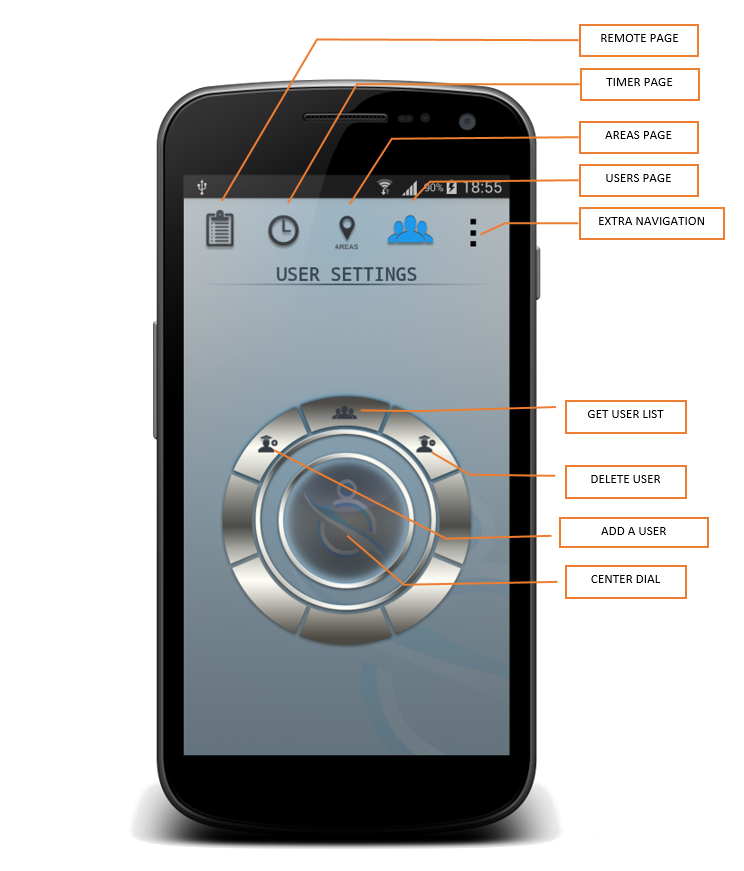
To add a user navigate to the users screen. There are three buttons on the dial in the users screen as shown below.
The procedure is quite simple, press the add user button, click on the center dial and fill in the SIM number of the user to be added, making sure to enter the number in international dialing format starting with +. In the box labeled Password put a four digit password for the new user. In the Permissions section select the permissions to be given to this new user and press done. The process is shown in the fig below. Refer to the permissions table for details of permissions.
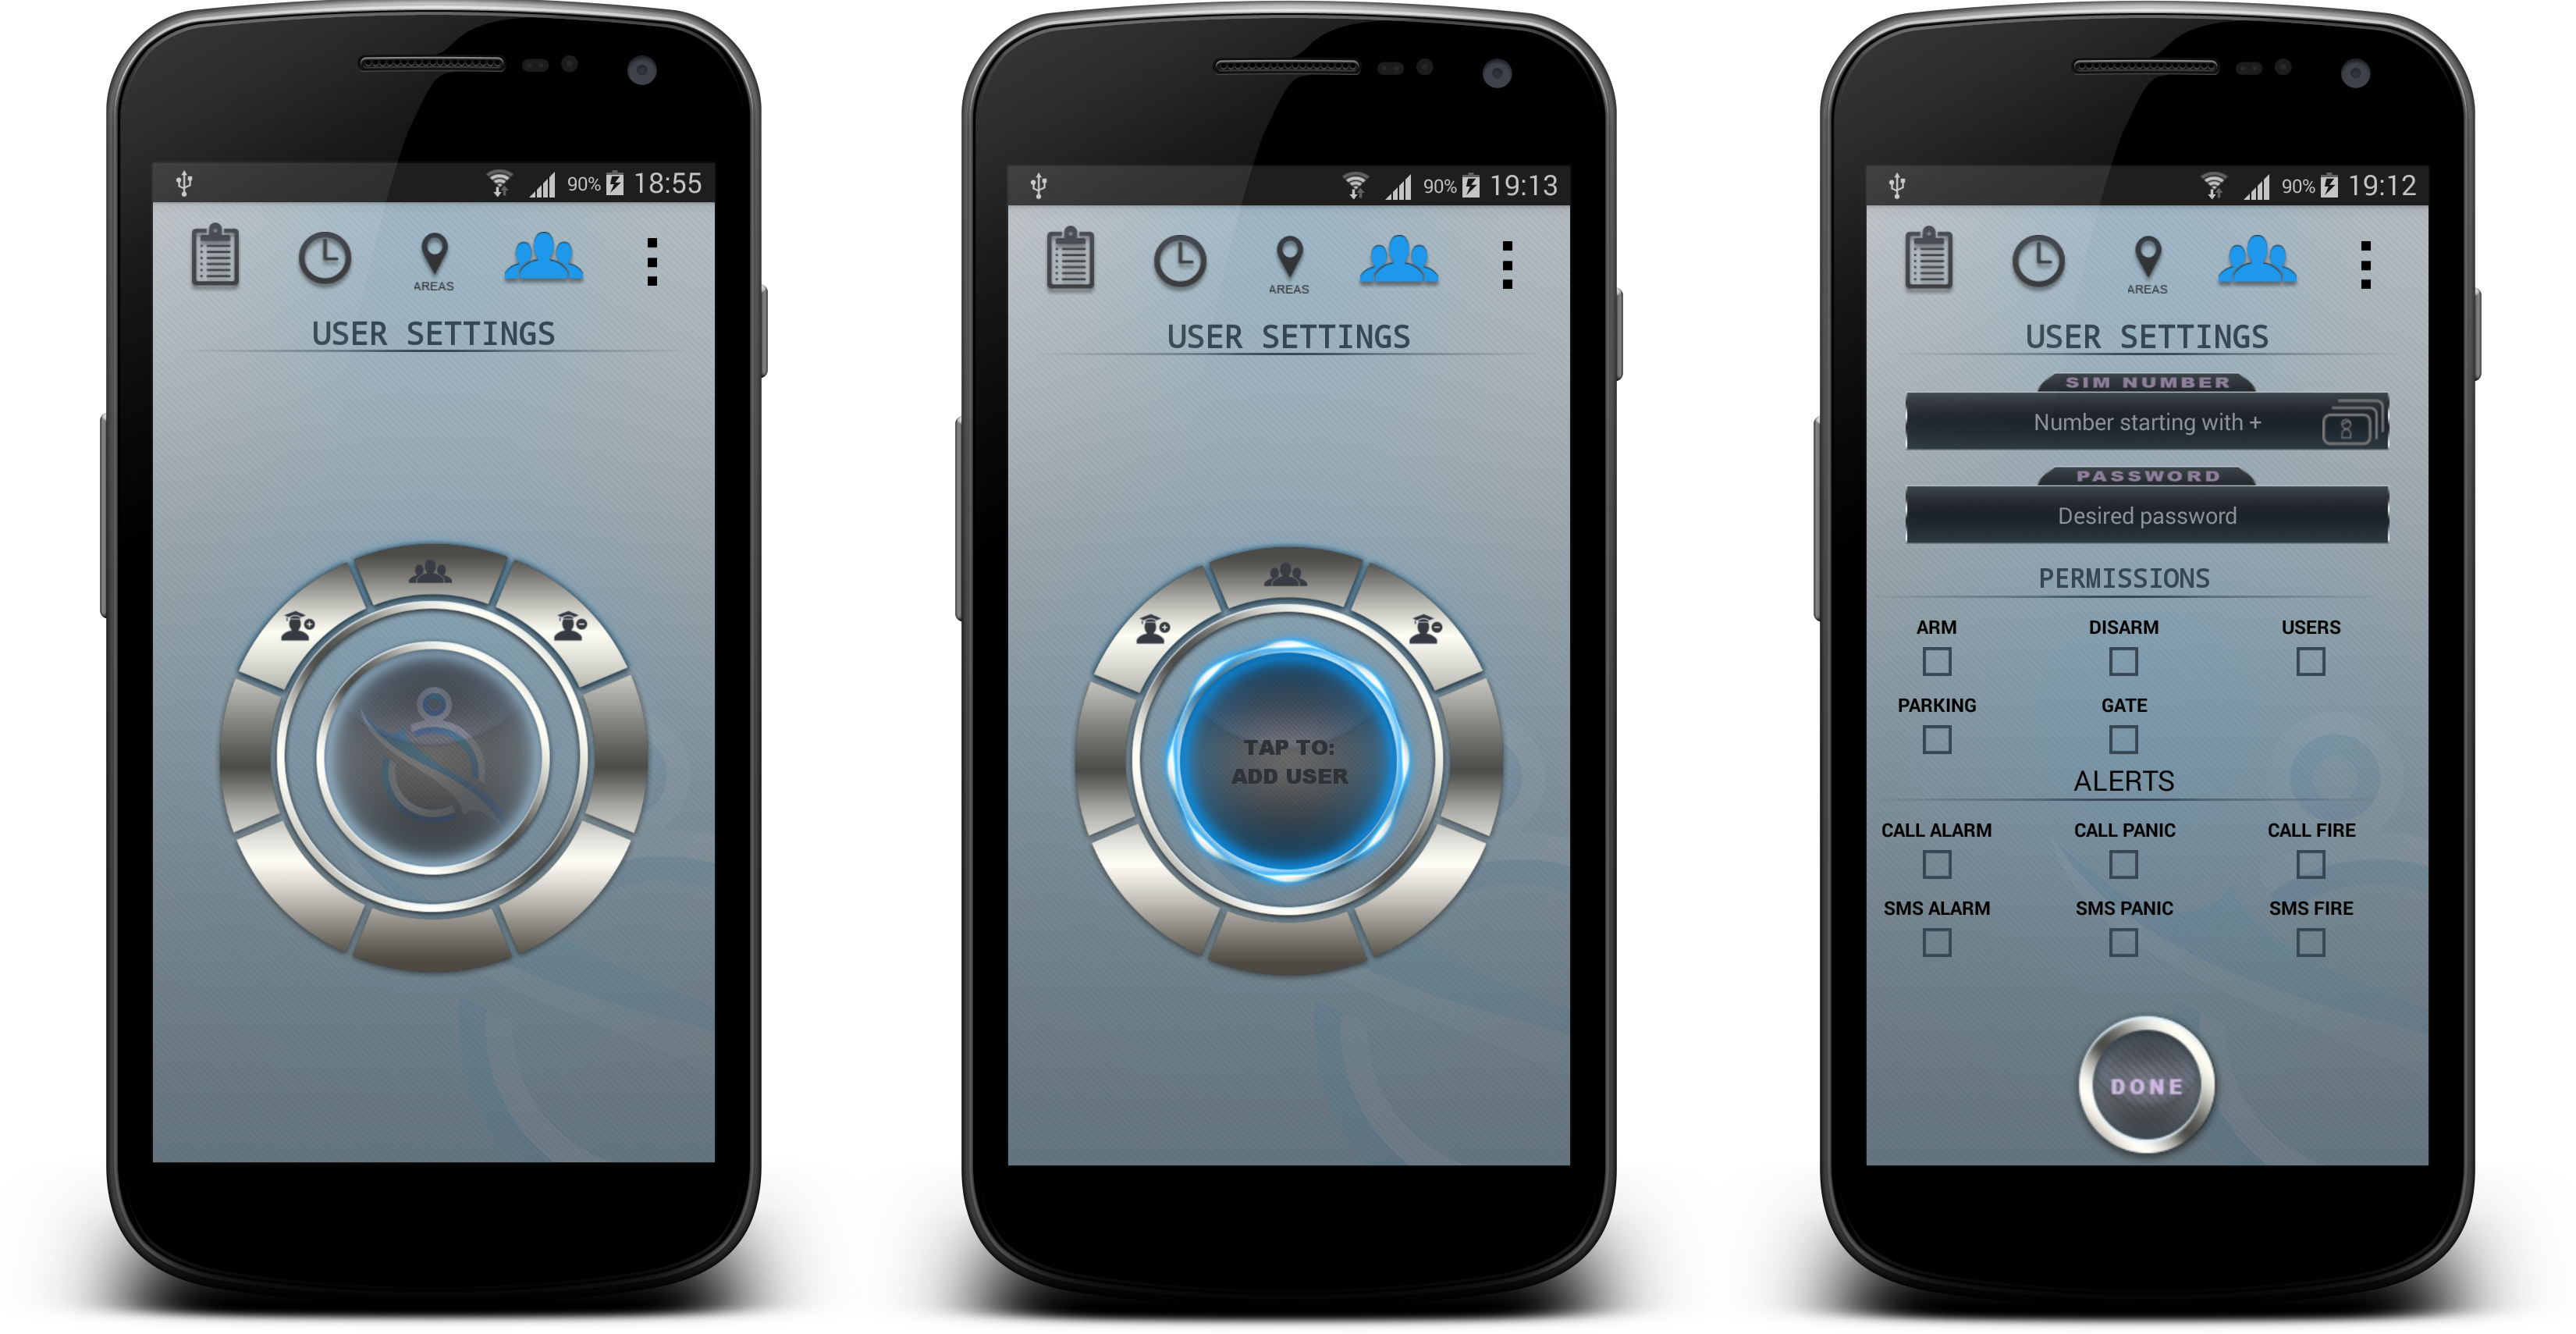
Deleting user and getting user list is straight forward.
When the system is new an admin must be added to SHAULA-791. In order to add an admin you must navigate to admin tools.
To open admin tools page :
- Navigate to the remote Page,
- Click on extra navigation icon and select the admin tools button.

To add admin just click on set admin button. This will bring forward an alert dialog and show the password that will be assigned to the admin which is the password that was entered while creating this account.
To set the device id, Enter the desired device id in the text field and press Set ID button. This will set the device ID.
To select the country click on the select country button and select your country from the list of countries.
To send service code like checking balance etc enter the relevant ussd code for example *102# and press send. This will send the the ussd code *102# to the network provider and the result will be sent in response.
To reset the device enter the password and click reset.
Recent Comments